Article content
10 August 2020 by David Ward
A guide to taking great pictures of the aurora borealis
Photographing the Northern Lights is a challenging, yet highly rewarding experience. Here we take a look at the how's, where's, why's and when's to give you the very best chance of returning from your aurora adventures with a series of pictures to be proud of.
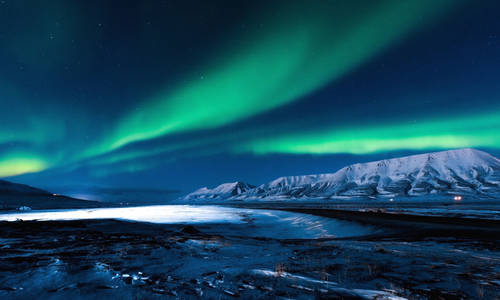
The Northern Lights are one of nature's great phenomena: a spectacular, jaw-dropping light show of greens, reds, yellows, blues and violets dancing across the clear night sky. For many, just seeing the aurora is enough to fulfil a lifetime's ambition, but to successfully photograph the Northern Lights is to ensure you'll keep that memory alive forever.
What are the Northern Lights?
Looking back through history there are many myths and legends surrounding the origins of the Aurora Borealis. The Sami people of northern Scandinavia believed that the lights were the souls of the departed, leaving earth for the last time. The Finns once thought that a magical fox, spraying snow into the sky with a sweep of its tail, was the cause of this mysterious, ethereal spectacle. In the Canadian Yukon, Eskimos believed that the lights were the dancing spirits of animals, or torches lit by the dead. The scientific explanation is a little less romantic of course, but just as fascinating nonetheless.
One of several astronomical phenomena, collectively known as Aurora Polaris (polar lights), the Northern Lights are caused when a solar explosion or flare ejects a cloud of gas from the sun. Carried by strong solar winds, some of these clouds eventually reach earth - a journey that takes around three days - and collide with our planet's magnetic field, creating currents of charged particles. As these particles travel past the Earth's magnetic polar regions they in turn collide with oxygen and nitrogen atoms in the upper atmosphere, creating the dazzling display we know as the Northern Lights.
Where and when can I photograph the Northern Lights?
The best places to see the Northern Lights are within the 'aurora zone', a sweeping arc that cuts across the Arctic Circle between 60° and 72° North. Sadly the Northern Lights are rarely seen in the British Isles, unless you travel to the far north of Scotland, but there are a number of destinations, some of which are just a short flight from the UK, where its possible to see the Aurora at its very best. The Nordic countries of Sweden, Norway, Finland, Iceland and southern Greenland are all prime spots for hunting the Aurora, or for those preferring to travel further afield, Canada also offers superb chances to see and photograph the lights.
The long nights of the cold Arctic winter offer the best chance to see the Aurora, and dark, cloudless skies make the perfect conditions to view and photograph the Northern Lights at their spectacular best. Head out between the hours of 19:00 and 02:00 when Aurora activity is at its strongest.
Those prepared to travel deep into the wilderness, away from towns and cities where street lights only serve to dim the effect, will be rewarded with the very best displays. Although this may seem like a daunting proposition there are a number of superb accommodation options and professionally led guided tours that offer the chance to visit regions within the Aurora Zone that might otherwise be out of reach.
Should I travel independently or with a group?
For those wishing just to witness the Northern Lights, independent travel to any of the destinations within the Aurora Zone will offer the chance to catch a glimpse of a display. However, if you're serious about photographing the Aurora and learning more about the myths and legends surrounding it, a guided group tour, whether its to Norway's remote Lofoten Islands or the spectacular winter wilderness of Iceland, gives you the chance to venture further off the beaten track to the very best locations, as well as receiving expert guidance on how to successfully capture the lights through your lens.
What camera equipment do I need?
Here's where things get interesting. The list of photography equipment available is almost limitless, but knowing what the best camera, lenses and accessories to take on a Northern Lights photography trip can make all the difference between average holiday snaps and a series of photographs to be proud of. Here we look at some of the things to consider when packing your camera bag.
Cameras
If digital's your thing, and for most it will be, a good quality DSLR with the capacity for shooting in low light is the way to go. Look for a camera body with a high ISO capability such as a Canon 5D Mark II or III (Nikon also offer a superb range of cameras, which are perfect for low light conditions). High ISO capability is critical for achieving the best results as it allows an increase in light into the camera, which is vital during the dark nights of the Arctic winter. Remember however, that the higher the ISO setting the more noise you'll get in your final pictures, especially in the darker areas of an image, so its best to choose a camera with good noise reduction. The higher end Canons for example can produce acceptable images with the ISO set as high as 3200, although the ideal range should be between around 400 and 800. Shoot your images in RAW mode to enable more efficient post processing and further noise reduction when you get home. If you have smaller capacity memory cards then sRaw1 or sRaw2 will give you the same flexibility but with a smaller file size.
Compact cameras
While not ideal for photographing something as technically challenging as the Northern Lights, it is still possible to get pleasing results using some of the better point-and-shoot, or compact cameras. Remember to look for one with high ISO range, manual focus and a wide shooting angle. And, always use a tripod.
Lenses
Your choice of lens is arguably the most important decision you'll make for successfully capturing the Northern Lights. The key here is wide and fast. Wide-angle lenses allow you to capture not only a vast chunk of sky, but also the spectacular surrounding landscape, which is vital in order to give your image some context. Also, its vital to choose a fast, high-aperture lens due to the low light conditions you'll be faced with. Andy Keen at Aurora Hunters recommends a wide angle with "an f-stop of 2.8 or greater". A lens with a wide aperture such as this will allow in plenty of light on those dark winter nights. Look for a lens that will give you pin sharp images with minimal vignetting and lens distortion for the best results. Also remember to carry a lens hood, which will help protect your lens from things such as frost and condensation.
Tripods
A tripod is an essential bit of kit for photographing the Northern Lights. As you'll be using your camera in extremely low light, exposure times can range from a few seconds to a few minutes, depending on the type of camera you have, the strength of the Aurora and the type of effect you're hoping to achieve. As such, hand holding the camera simply isn't practical, as it's impossible to hold the camera still enough for such a long period of time. Attempting to hand hold the camera will lead to blurred, out of focus images and aching arms, while rendering the sharpness of your brand new lens completely useless. Make sure your tripod is sturdy - as you may have to contend with other elements such as a strong wind or an uneven surface of snow and ice - and tall, so you're not continually bending down to see the viewfinder as your camera is pointing towards the sky.
Other accessories
There are a number of accessories worth remembering to bring on a photography trip to the Arctic, one of the most important of these being spare batteries. The cold weather saps batteries at an alarming rate so its vital you have some spares on hand, making sure you keep them as warm as possible when not in use. It's also advisable to carry one or two spare flash cards with you. There's absolutely nothing worse than finding your flash card isn't working and you don't have a spare, your trip will have been completely wasted.
Another useful item to carry is a remote shutter cord, which removes any possibility of camera shake when the shutter is pressed, which again helps to achieve the sharpest image possible. It's worth investing in a thick cable and also a spare as these have been known to freeze in the cold winter conditions.
What about those cold Arctic nights?
Along with your precious camera equipment it's important to bring adequate protection against the unforgiving conditions of an Arctic winter. The weather in the Aurora Zone can be harsh and you'll more than likely be spending several hours at a time outdoors. Warm clothes, hats and gloves are absolutely essential as is appropriate footwear. Also remember to bring a head torch, which will free up your hands for using your camera, as well as shoving in your pockets as you wait for the lights to appear.
Most importantly remember that photographing the Northern Lights is an exhilarating, fun and challenging adventure, which for many is a once-in-a-lifetime experience. As such its vital to respect not only the environment in which you're shooting, but also to respect your fellow photographers as you all strive to capture one of nature's greatest events.
A quick recap:
- Travel with the experts – you'll learn more, see more and ultimately end up with far better pictures.
- Choose the right camera – A digital SLR with a good ISO range is the best bet
- Pick a wide and fast lens for the best results
- Make sure to bring a tall and sturdy tripod
- Batteries run out quickly in the cold so bring some spares, as well as some extra memory cards
- A remote trigger is a useful accessory to help with those long exposures
- Come prepared and wrap up warm
- Enjoy


